Saturday, May 25, 2013

Kooky Cookies

Hello fellow readers,

I'm writing to you on my all time favourite weekend of the year. Meaning that it's the Great Glebe Garage Sale and Ottawa Race Weekend!!! Thrifting/running... could it get any better? I think not. Oh wait, it can! PLUS my cousin Moni is in town because it has become a tradition in the past years that my Peterborough fam comes down for the races. 

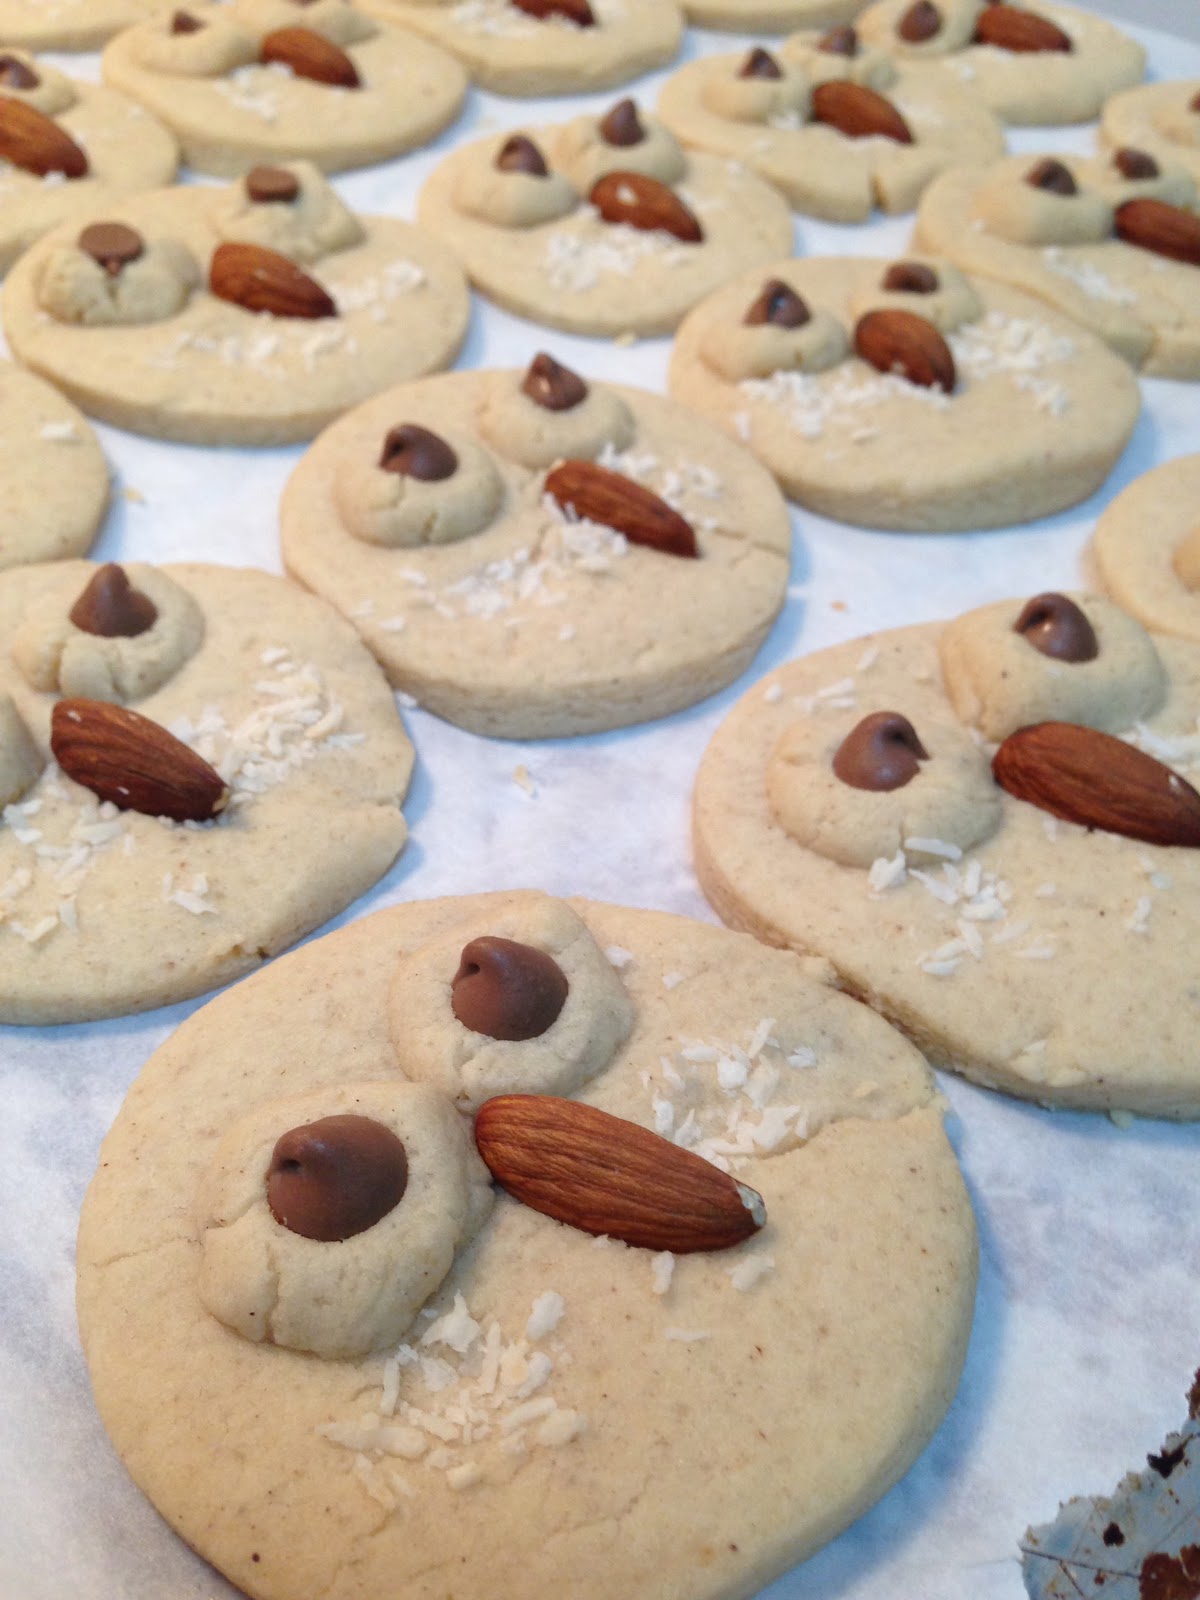
Instead of posting some über cool pre run meals/snacks like I probably should, I'm going to show you guys how to make owl cookies. You might be wondering why I suddenly had an urge to make animal shaped cookies, the reason is simple. A couple of weeks ago it was my friend Julia's birthday. Small back story: Julia and I worked at Dovercourt as camp counsellors for the past four years but we hadn't really gotten to know each other. Then, I find out she's the ONLY person I know going to Bishop's and she is in business too. So long story short, we are now good friends and I wanted to bring her owl cookies because she LOVES and I mean LOVES owls. If you still don't believe me, visit her owl themed pinterest board. Seeing as both of our offices are downtown, we met up and I presented her with these kooky owl cookies.

Kooky Owl Cookies

from Take a Megabite


Ingredients

- 3 cups of flour
- 2 tsp baking powder
- ½ tsp salt
- ½ tsp ground cinnamon
- ¼ tsp nutmeg
- ⅛ tsp ground ginger
- ⅛ tsp allspice
- pinch of cloves
- ½ cup sugar
- ½ cup brown sugar, packed
- 1 cup unsalted butter, at room temperature
- 1 egg
- 1 tsp vanilla extract

For the toppings:
- Chocolate chips (about a quarter of a bag- 2 per cookie)
- Almond (1 per cookie)
- Coconut (a pinch sprinkled on each cookie)


Directions:
✿ Whisk together the flour, baking powder, salt and spices in a medium bowl. In a large bowl using an electric hand mixer, beat the sugar, brown sugar and butter together until light and fluffy, 2-3 minutes. Blend in the egg and vanilla. With the mixer on low speed, mix in the dry ingredients until just incorporated. Form the dough into a disk and wrap in plastic wrap and chill until firm, 30-60 minutes.
✿ When ready to bake, preheat the oven to 350ºF. Line baking sheets with parchment paper and set aside. On a lightly floured surface, roll the dough out to about 1/4 inch thickness. Cut out using a (2 1/2 inch) round cookie cutter. Roll out 2 small balls of dough for each cookie. Place the rounds where the eyes would go for the owl and press a chocolate chip in the center of each. Press an almond between the eyes for the beak and press coconut on the sides for feathers.
✿ Bake for 10-12 minutes. Allow to cool for a couple minutes on the baking sheets before transferring to a wire rack to cool completely.
Enjoy the cookies, they're easy and people like them because they're impressive looking!

The hat I got at a garage sale

Monday, May 20, 2013

Memorable Meals and Monsters

Hi readers,

I hope you guys have been having a nice long weekend! It's so nice out, I don't know how you couldn't. If you've been stuffing your face all weekend, that's A OK. I made a batch of my friend Erica's (from Bishop's) Skor bars and I practically ate half of the 9x13 pan myself. I brought them to my picnic, which was super fun! There's just something about picnics, they're fun, innocent, and such a pleasure. Really, I got to eat yummy food by the water with three of my best friends. Seriously, how could that not be great?


Gabriela, Maggie, Pascale, and I got to laugh at all the other people who had the same idea as us.  I have to admit I LOVE people watching (were those caps too much? #stalker) and it was the perfect setting. Some went a little over board (think 15 pizza boxes and a portable bbq), and other families invited every Tom, Dick, and Harry they knew to have a celebration in the park. What mattered was that everybody was soaking in the late afternoon sun and just having a dandy of a time. Here is a list of picnic food I made:

✿ Chicken and Pesto Mayo Sandwiches
- French bread
- Mayonnaise and pesto combined in a small bowl.
- Sliced chicken
- Havarti cheese
- Alfalfa sprouts

✿ Veggie platter with dip


✿ Erica's Skor bars 

Which are the best thing ever EVER EVER. Four ingredients and easy peasy.


Ingredients:
- 1 cup butter
- ¾ cup brown sugar
- 1 sleeve of Premium Plus salted crackers (or however many you need to cover the bottom of the pan)
- 1 package milk chocolate chips

Directions:
1. Line a 9x13 baking pan with tin foil. Spray with pam.

2. Heat oven to 300 degrees.

3. Place crackers in the pan salt side up.

4. Melt butter and brown sugar, mix well. Pour over crackers.

5. Bake for 10 minutes

6. Remove from oven and sprinkle with chocolate chips immediately. Spread evenly as they melt or stick them in the oven for a minute to melt them more quickly.

7. Freeze for at least two hours.

These were delicious but they're not the healthiest things and so my next recipe is for a mega smoothie Maggie recommended to me. It's from the blog Oh She Glows  and it's healthy AND delicious. The "Green Monsters" are perfect for breakfast and paired with a good bowl of oatmeal, I can last until lunch no problemo. I was a little skeptical at first because it's green and green means gross right? Wrong! Green means packed with great nutrients and I can barely taste it. I have made the recipe with kale but you can use spinach instead. 

Green Monster 

From Oh She Glows

Ingredients:
- 1 cup almond milk (or whatever milk you wish)
- 1 banana, peeled and frozen
- 1 handful of kale (or if you're using spinach, 2 handfuls)
- 1 tbsp nut butter (I use crunchy natural peanut butter)
- 1 tbsp chia seeds OR 1 tbsp ground flax
- 2 ice cubes

Blend everything and enjoy!


Yum!! Put one of these monsters in a to go cup/mug and you're set. Just don't forget to do a quick mirror check because chia seeds are pesky and they can get caught in your teeth.

Have a nice week,

xox Gaby


Tuesday, May 14, 2013

Pecan Pie

Hi guys,

The other day I said that I made a pecan pie, but I didn't post it until my cousin Lindsay requested it! Speaking of my lovely cousins Lindsay and Lisa, these great girls got me the most wonderful "welcome to the blogosphere"  gift and I was so excited when it came in the mail. I will most definitely be using the bamboo cutting board and knife for my kitchen adventures.


Ok, ok, here is the recipe from the Sugar Sugar cookbook. 

Lucinda Bell's $100 Pecan Pie

Ingredients

- 1 single-crust pie shell, unbaked ** Confession time: I used a store bought pie shell, I know, I know, that's like kicking a puppy or stealing from the poor but it was a weeknight and I was in a hurry.**
- 1 cup granulated sugar
- ¼ cup butter, at room temperature
- 3 large eggs
- 1 cup light corn syrup
- 1 tsp vanilla extract
- 1 cup pecans

✿ Preheat your oven to 350 degrees. Place the rolled-out pie dough in a 9-inch pie plate and flute the edge. 

✿ Place the sugar and butter in the bowl of a stand mixer fitted with the paddle attachment and beat on medium speed until light and fluffy (I used a handheld mixer and that was alright). Reduce the speed to low and add thee eggs, one at a time, mixing just until each is incorporated. Add the corn syrup and vanilla extract. Use a wooden spoon or spatula to fold in the pecans. Pour the filling into the pie shell and bake for 45 to 50 minutes. Remove from the oven and set aside to cool completely before cutting.

✿ I needed to cook the pie for a little longer (5 minutes more) and let it set in the fridge for an hour because it was really jiggly when it came out of the oven.


Enjoy it, it's rich and decadent, but totally worth the extra calories ;)

xox Gaby


Saturday, May 11, 2013

Something's Fishy

Hi friends,

I hope everyone had a good week and is getting ready for Mother's Day tomorrow. I started my job this week, and I am beyond excited by how official everything is. I get my own security badge (which I scanned the wrong way one time and set off an alarm... my bad), cubicle, and a laptop. There's even a supply room where you can get unlimited help-yourself office supplies, a.k.a. heaven. I can't give out too much information about anything because the audits are kind of secret. In June, I am going to spend two and a half weeks in Montreal, on a business trip. Picture this: Me stepping off the train in a power suit and hailing a cab in downtown Montreal... So basically my life will be complete. Hopefully I'll be able to come home for weekends to cook for the blog, but I can always do restaurant reviews!

A couple of times this week I made two of my favourite fish recipes. They are so easy but so delicious. Those are two key elements in off campus cooking. The first one is Parchment Paper Fish. This recipe can be altered to the way you like it because you can use whatever type of fish and vegetables that you wish to eat.

Parchment Paper Fish, also called Half Moon Fish

For one

1. Take a piece of parchment paper about two feet long and spray it with cooking spray or spread a little oil around.

2. Place the piece of white fish of your choice, I used cod, on the prepared sheet of parchment paper. Put the fish to one end because you need to fold half of the parchment paper over the fish. Place any sliced vegetables on top. Good veggies to use are zucchinis, tomatoes, peppers, etc.

3. Sprinkle some seasonings and/or lemon juice on top as well as a splash of olive oil. I recommend rosemary, basil, and s+p.

4. Fold the parchment paper in half, and then roll up the ends together to make a half circle shape. I know that you probably can't get the image in your head, but hold your horses and scroll down to the pictures.

5. Cook on a baking sheet at 425 degrees for about 20 minutes or until the fish is flaky. The sealed parchment paper will keep in the steam and cook the fish with all the flavours trapped inside.

NOTES:
* I used mangoes and lemon, but I wouldn't recommend that combo because the acidity of the lemons brought out a weird taste in the mangoes

** I used a pizza baking sheet but a regular cookie sheet works well too.

*** If you're making more than one fillet, use one sheet of parchment for each piece.


I'm really not kidding when I say this recipe can be altered to your taste. Just chuck some veggies and fish onto a piece of parchment paper and you're set!

The other recipe is also simple and yummy. It's adapted from the Rose Reisman's Family Favourites cookbook and is great for a quick weeknight meal, plus if you have more of the cream cheese filling it's great on a cracker.

Every recipe is awesome in this book!

Salmon with Pesto and Cream Cheese

Ingredients
- ¼ cup of softened cream cheese
- 2 Tbsp of pesto (homemade or store-bought)
- 4 salmon fillets
- 2 Tbsp toasted pine nuts, almonds, walnuts, or pecans

✿ Preheat the oven at 425 degrees. Line a baking sheet with parchment paper or foil and lightly coat with cooking spray.

1. Combine the softened cream cheese and the pesto in a small bowl until smooth.

2. Make a vertical slit from the top of each salmon fillet to within ¼ inch of each end and about ½ inch deep.

3. Stuff each fillet by dividing the pesto filling between the 4 fillets.

4. Top the fish with the nuts if you haven't toasted them or garnish the fish after you baked it if you have toasted the nuts prior to baking.

5. Place on the prepared and bake for about 15-20 minutes, or until flaky.


I guess the moral of this blog post is get off your computer or phone or whatever gadget you're using, and run to the store to get yourself some parchment paper. I use it for everything and I haven't made a burnt cookie since I bought my first roll. Good old Martha Stewart recommended it and I haven't looked back. 

Have a wonderful week and don't be afraid to be a little fishy this week.

xox Gaby

p.s. It was my dad's birthday this week and I made him a pecan pie that was oh so delicious. If you think I should post the recipe leave a comment.


Saturday, May 4, 2013

Biscuits and Bargains

Hi Everyone,

For the past week I have been going to rummage sales around Ottawa searching for stuff for my house next year. I have been finding so many deals! This morning I drove by a lawn bowling club and they were bringing the leftover merchandise out to the curb because the sale had finished. I ended up getting a crock pot, some pots and pans, a table top lazy Susan, and a water jug for ten bucks. The woman and I were bonding and she was basically begging me to take things "off her hands".

I also bought a lovely white ceramic cake pedestal from Chapters (who would have thought?) thanks to a gift card from my god parents Tim and Barb. If you're reading, I'd been saving it for something I absolutely needed to have and the cake stand is gorgeous, so thanks a bunch. I will post photos when I make a cake worthy enough to sit on top of it.


This week I went through a few more of my cookbooks and found some awesome cooking blogs. I used a recipe from The Complete America's Test Kitchen TV Show Cookbook (2001-2010) to make their Best Drop Biscuits. Trust me, they are seriously the best! I have tried many biscuit recipes that have turned out flat or dry but these were light, fluffy, buttery, and just perfect. I made a batch and ate some with some chicken salad I had made with leftover bbq chicken and a few other ingredients laying around (apples, carrots, onions, mayonnaise, s + p).


Best Drop Biscuits

From The Complete America's Test Kitchen TV Show Cookbook (2001-2010)

It is supposed to make 12, but I made 9 slightly larger biscuits.

- 2 cups unbleached all-purpose flour
- 2 tsp baking powder
- 1 tsp sugar
- ¾ tsp table salt
- ½ tsp baking soda
- 1 cup buttermilk, chilled **
- ½ cup unsalted butter, melted and cooled slightly, plus 2 Tbsp melted butter for brushing the biscuits.

Note:
** I never buy buttermilk, but instead I make it with lemon juice and milk. Just poor a Tbsp of lemon juice in a one cup measuring cup and top it off with milk. Let it sit for two minutes and you're good to go!

✿ Adjust an oven rack to the middle position and heat the oven to 475 degrees. Line a large rimmed baking sheet with parchment paper (FYI, I swear by parchment paper! Makes evenly baked goods and no need to grease the pan.) Whisk the flour, baking powder, sugar, salt, and baking soda together in a large bowl. Combine the buttermilk and ½ cup of the melted butter in a medium bowl, stirring until the butter forms clumps (Clumps are good, don't fret!).

✿ Add the buttermilk mixture to the dry ingredients and stir with a rubber spatula until just incorporated and the batter pulls away from the sides of the bowl. Using a greased ¼ cup measuring cup, scoop a level amount of batter and drop onto the prepared baking sheet. Repeat with the remaining batter, spacing the biscuits about 1½ inches apart. Bake until the tops are golden brown and crisp, 12 to 14 minutes. 

✿ Brush the biscuit tops with the remaining 2 Tbsp melted butter. Transfer to a wire rack and cool 5 minutes before serving.

✿ To refresh day-old biscuits, heat them in a 300-degree oven for ten minutes.

I had put two biscuits on my plate for lunch but they are just so filling I only managed to finish one of them. These are so simple and speedy, you don't need a whole roast beef dinner for these, they can be whipped up on a week night.

I am currently working on a super post about single serving mug desserts thanks to my friend Erica who showed me some awesome posts. I am tweaking a lot of the recipes because everyone's microwave is different but it's great because they're only one serving so if it turns out not that great, I didn't ruin a whole batch. Here's a little preview of what's in store ;)


xox Gaby

p.s. Hi Kelly! I told you I would make you blog famous. Miss you.

Friday, April 26, 2013

Cookbooks on cookbooks

Hi lovelies,

Just to let you guys know, as I write this post I am wolfing down a scrumptious bowl of Easy White Chocolate Mousse (don't freak out, recipe to follow).

This past week has been just wonderful. It was pretty sad to leave my home away from home, but it also means that IT'S SUMMER! I don't start my job until the beginning of May so I have a few days of well deserved lazing around in my pyjamas. I have been cooking a bit but mostly catching up on TV shows and spending time outside, soaking up all this beautiful weather. Can you say perfect running weather? I did, however, go to the library to get a few (and by a few I mean seven) cookbooks. I love my library so much so it was nice to be back and chat with the librarians.


 First, I decided to try out "The Best Veggie Burger on the Planet" and "Joy the Baker" cookbooks. From the burger book, I made their Tabbouleh Burger which was just okay. If you would like the recipe, leave a comment below, but trust me, it wasn't anything to write home about. What I did like about the recipe was that you could either make 10 patties, or use half of the tabbouleh salad to make 5 patties and use the rest as just a salad. I opted for the latter and the salad was great but the burgers were a little lacking of something. To go along with the whole lebanese theme I made homemade hummus from Canadian Living. I swear that magazine has a great/easy recipe for everything. Whenever I want to make something, I Google it and when it's from Canadian Living I know it's going to turn out well. To add to the rest of the meal, I made pita chips by cutting up pita bread brushed with olive oil and various spices (my favourite is rosemary). I just threw those puppies in the oven at 375º F. 


Then, since I was little depressed about my burgers, I decided to make my mom a combination of her two favourite things: white chocolate and mousse. Joy the Baker came to my rescue; she is so awesome! She has the best cooking blog and who could resist a cookbook that says "A celebration of butter and sugar" on the cover? Her Easy White Chocolate Mousse recipe is to die for and you may realize the truth of my words by the fact that I'm eating a bowl of it before 11 AM. The best part of this recipe is that it really is easy.  I also loved that she asked for 6 ounces of white chocolate because that's the amount of white baker's chocolate that comes in a box. The hardest part of the recipe is that you have to wait for it to chill for at least two hours (gasp!). But serve it in a delicate crystal bowl garnished with fruit and you're golden. My rating is 10/10, and that doesn't come around every day. 


Easy White Chocolate Mousse

from Joy the Baker

- 2 Tbs water
- 2 Tbs unsalted butter
- 6 ounces of white chocolate chunks
- 1¼ cups heavy cream
- 2 tsp powdered sugar
- Pinch of salt
- 1 large egg yolk, beaten.

✿ In a medium saucepan over medium heat, combine water, butter, and chocolate. Stir until chocolate is melted. Remove from heat and place mixture in a medium bowl to cool slightly.

✿ In the bowl of an electric stand mixer fitted with the whisk attachment**, combine cream, sugar, and salt. Begin with the mixer on medium speed, gradually increasing to medium high, beat until stiff peaks form***. Remove the bowl from the mixer and set aside.

✿ By now, the chocolate should be just warmer than body temperature. Whisk in egg yolk until combined.

✿ Add half of the chocolate mixture to the whipped cream. Fold together until just incorporated. Add the remaining chocolate mixture to the whipped cream. Try not to overmix the mixture and deflate the whipped cream. Transfer mousse to smaller bowl. Place a piece of plastic wrap directly over the mousse, and refrigerate for at least 2 hours before scooping and serving.

✿ Mousse will last, in an airtight container, at room temperature for up to 3 days.

Notes:
** I didn't use a stand mixer, I just used a handheld mixer and it worked perfectly. Don't sweat it!
*** Stiff peaks means that the whipped cream should keep its form when you take the mixers out of it.   The peaks shouldn't slump over. If they do, keep mixing!!

Try it out and tell me what you think!

xox Gaby

p.s. I used my grandma's crystal bowls to serve the mousse which just makes everything better.

Friday, April 19, 2013

Welcome!

Hi friends, family, and casual visitors! I am thrilled that you decided to follow my journey as I prepare for my first time cooking away from home. If I do say so myself, I have a few tricks up my sleeve when it comes to kitchen knowledge. With that being said, it's a whole new ball game when you're living away from home with limited ingredients and a budget the size of my left toenail. This past fall, when I came to Bishop's University, I lived in rez and even managed to bake a few things using limited resources (think some Skor chips, a jar of peanut butter, and a mini fridge).

#sketchy
Even though I loved living in Mack this year (Go Gaiters!), I am itching to have my own kitchen to throw big dinner parties or even just make myself a goat cheese grilled cheese. I know I sound like a 35-year-old soccer mom when I say this, but when my roomies and I were house hunting I totally judged the house on its kitchen. I have to say that ours is pretty stellar, but so is the rest of the house. Did I mention it has a pool?!

Gorge eh?
I have always wanted to write my own blog and I thought this was the perfect time. For the first little while I won't be cooking in my new kitchen in Lennoxville, home of BU, but instead back home in Ottawa. This summer, I will documenting my recipe and kitchen gadget search, with the odd post about things I have made. So sit back, relax, and have a chuckle as you read about how I will attempt to survive on something other than tuna and soda crackers.